The end result is to be a patchwork waistcoat for a fancy dress party. I took photos as I went along .... in the hope that something decent would appear at the end of the sequence!
And..... as it is now finished..... I have edited this to put the final picture at the top of the post!
So I started with an old fleece.
And removed the arms just inside of the seam-lines.
The neck, zip and waist band were also removed.
I cut the pockets out, by just cutting out a hole in the fabric around the zip.......
............... and removing all the pocket linings too.
Next I borrowed a real waistcoat to use as a template for the shape.. a bit of altering needed.
So, I spread out just one side of both waistcoats, and used the good one as a template....
And I started trimming to make it match:
Next to make both front panels match:
I'm ignoring the holes where the pockets were for now, and will shape the back panel next.
I lined the two waistcoats up again.... and the fleece is much wider altogether!
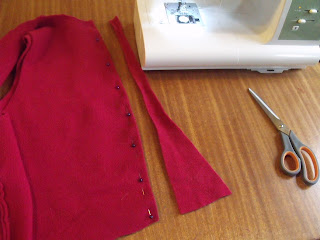
I've run a line of pins along the line I intend to stitch to reduce the size of the fleece waistcoat...
Here I've used the real waistcoat as a template again.
And then I made both sides match:
I finished the first day's efforts by selecting fabric for the patch-working.
******************************************************
So picking this project up on day two.... I had tried the waistcoat onto hubby, and found that back needs a little more taken out in the centre of the back. Re-pinned the line of pins....
Cut away the excess...
Laid the two pieces together over lapping - I wanted a flat join so that the patch-working doesn't bulk up down the middle of the back panel. Pinned.
Put a bit of fabric into the pocket gaps....
And ran two lines of stitching over all the joins. So now the shape is complete.....
So now the fun begins with all the patch-working pieces. I started at the top of each panel and laid the bits out, overlapping all the way down.... (and added the diamond for fun...)
Pinned everything and then used a zig-zag stitch over the edges of each piece. I've used a pink-red thread that tones in with the colours.
Then it was a case of just keeping stitching!
The reverse looks interesting.
Extra fabric cut away.... I did the same with the other front panel.
And the back section....
And much stitching later, a patchwork waist-coat starts to emerge!
******************************
Day three, and almost there now. Just need to add bias binding.
My new sewing machine makes it easier to do arm holes etc. because I can remove a section so that the material feeds round and under the sewing platform....
And finally:
And the back:
Seriously, I probably wasted too much time and energy on this.... but I rather like the end result!


Yep, I'm thinking that this 'little' waistcoat took a lot of time. But it looks brilliant! Sometimes it's nice to get lost in a project.
ReplyDeleteYup.. "Lost" - For sure! LOL
ReplyDelete... but he has agreed to wear it to the "Funky" fancy dress gathering tonight! :)
Thought you might like this - another way to lose more time http://www.fleecefun.com/christmas-stocking-how-to.html and make people smile too.
ReplyDeleteToo many nice ideas out there!!!!!! :) Am making a few Christmas pressies this year.
DeleteI was looking for a patchwork waistcoat for myself and now I've seen this I'm going to convert a plain black one I've never used with the method. Thanks for the inspiration
ReplyDeleteIt's cool but I think you can find other ideas to recycle more fleece
ReplyDelete