Thursday 22 November 2012

Patchwork Waistcoat from an Old Fleece!

The end result is to be a patchwork waistcoat for a fancy dress party.   I took photos as I went along .... in the hope that something decent would appear at the end of the sequence!

And..... as it is now finished..... I have edited this to put the final picture at the top of the post!


So I started with an old fleece.


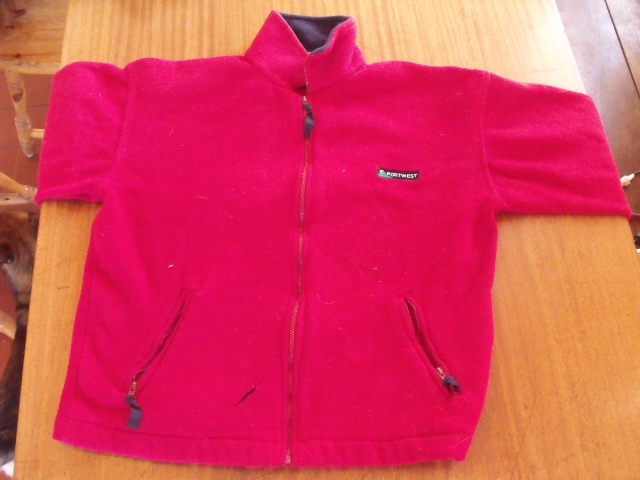
And removed the arms just inside of the seam-lines.


The neck, zip and waist band were also removed.


I cut the pockets out, by just cutting out a hole in the fabric around the zip.......


............... and removing all the pocket linings too.


Next I borrowed a real waistcoat to use as a template for the shape.. a bit of altering needed.


So, I spread out just one side of both waistcoats, and used the good one as a template....


And I started trimming to make it match:


Next to make both front panels match:


Arm holes as well:


I'm ignoring the holes where the pockets were for now, and will shape the back panel next.


I lined the two waistcoats up again....  and the fleece is much wider altogether!


I've run a line of pins along the line I intend to stitch to reduce the size of the fleece waistcoat...


Here I've used the real waistcoat as a template again.


And then I made both sides match:


 I finished the first day's efforts by selecting fabric for the patch-working.


******************************************************

So picking this project up on day two.... I had tried the waistcoat onto hubby, and found that back needs a little more taken out in the centre of the back.  Re-pinned the line of pins....


Cut away the excess...


Laid the two pieces together over lapping - I wanted a flat join so that the patch-working doesn't bulk up down the middle of the back panel. Pinned.


Put a bit of fabric into the pocket gaps....


And ran two lines of stitching over all the joins.  So now the shape is complete.....


So now the fun begins with all the patch-working pieces.  I started at the top of each panel and laid the bits out, overlapping all the way down.... (and added the diamond for fun...)


Pinned everything and then used a zig-zag stitch over the edges of each piece.  I've used a pink-red thread that tones in with the colours.


Then it was a case of just keeping stitching!


The reverse looks interesting.


Extra fabric cut away....  I did the same with the other front panel.


And the back section....


And much stitching later, a patchwork waist-coat starts to emerge!  


Bias binding tomorrow I think....

******************************

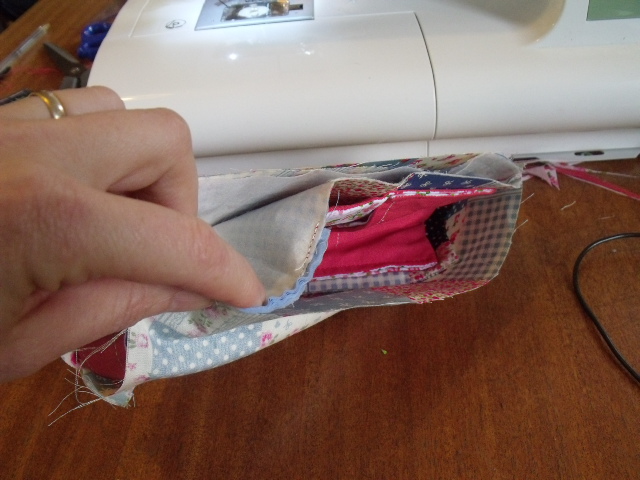
Day three, and almost there now.  Just need to add bias binding.


My new sewing machine makes it easier to do arm holes etc. because I can remove a section so that the material feeds round and under the sewing platform....


And finally:


And the back:


Seriously, I probably wasted too much time and energy on this.... but I rather like the end result!

Saturday 10 November 2012

Messing around with Sewing Machines

2012 has got to have been the year for Sewing Mania in our household.  Early in the year I'd got out the sewing machine that I inherited from my grandmother (a 1934 Singer) and started making various little things.

And the family got interested too       .....  (my god-daughter on the left ;) )


And to keep them all from borrowing my machine all the time I went onto ebay and bought some more second hand machines.  One is dated 1890!  And - with minor tweaks - they all work beautifully!

My eldest daughter got very into making quilts:


And managed to quilt it up using the old Singer rather well....


Other little projects were less ambitious 
And sometimes a bit silly!  Say Hello to Honey the mobile pin cushion.


And here's my dog Patsy in her new rain coat!  I made the mistake of giving her a haircut in February.... and then realised she was a bit cold on walks!  This is made from an old fleece and an old anorak.


These Singer machines are so durable and solid.  All in all a day around the kitchen table with sewing machines is a great way to spend a day.  This picture was probably taken in Feb 2012, and we've had a couple more sessions since! 


 "Stitch and Bitch" as a friend calls this sort of session!


Sunday 4 November 2012

Purse / Wallet Step by Step

I used the tutorial found here:
http://modestmaven.blogspot.co.uk/2012/02/bi-fold-wallet-tutorial.html

To make a wallet style purse like this:


I chose my colours... here pictured with labels of sizes:


After applying interfacing to the required bits, I sewed up the tab, and snipped off the corners.


Turned it right side out and ironed and stitched around the edge


Sewed 3 sides of the lining (for the section for bank notes) - leaving a gap open for reversing the whole thing later.  Top edge not sewn at this stage either.


Next took the long strip for the credit card section. Set a paper card up 4" down.


Folded the 4" back underneath and ironed.


Then flipped the material over the card (keeping it in place as a marker) and ironed the fold created.


Pulled the material back down, and, leaving  small bit of the card visible folded & ironed again.


Repeated the flip up over the card & ironed again.


And down again and iron.


Made a total of 4 folds (3 card pockets) like this.  Ironed all in place.


Ran a line of stitching up either side and trimmed excess.


Next the coin pocket.  I decided to add interfacing to the whole outer section and also the flap end of the inner.  Trimmed the flap end to a slightly narrower and rounded shape.


Stitched 3 sides, right sides facing.


Turned inside out.  Then stitched the middle section of the coin pouch to one side of the wallet inner, leaving an offset as shown.


The second side was likewise stitched down.  As the pocket does not lie flat (ie it can bulge with coins) I took a fold in the centre of the material, and stitched it down.


Turning up the front of the coin pouch, shows the extra room this leaves for coins.


Both sides were then stitched down.  The card holder section was stitched into place on the opposite side.


Next tab, that will close the whole wallet, was stitched to the inner.  The side that will be outermost, left uppermost!


Then the outer is placed on top of the inner and stitched down on 3 sides.


Next it is turned right way around.


And the outer (right side out) is placed inside the lining (wrong side out).
The outer may need to be doubled over at the bottom to make it fit, this is okay.


The edges are joined.  This is the fiddliest part of the whole project.  Once stitched, use the gap left in the lining to pull the main part of the wallet through....


It should look like this.


Sew up the hole in the lining by folding the rough edges under and over stitching.  This bit will be hidden inside the bank note section.


Then I tucked the lining inside the wallet and top stitched around the opening.  Also I top stitched around the remaining 3 sides of the outer.

Now all I need to do is add fastenings - I will use velcro I think.


Well it's not perfect, but I'd a load of fun doing it!  :)


PS I sewed on velcro after making the wallet - but this would have been much easier done during the making-up stages!